Ventilating COPD Part 2
I want to continue on this theme about COPD and some ventilator strategies in patients with COPD. We talked about the elevated CO2 levels. Let’s talk about just ventilating these patients in general.
As you know, the problem with COPD is the fact that air can’t come out. So if we look at a kind of a schematic of the lungs. You’ll see that as these things branch, you get smaller and smaller. Bronchi. And if you can see it down to the level here where you get to these small levels, there actually is pretty narrowed airways and there is what we call obstruction. Chronically, that’s why we call it chronic obstructive pulmonary disease. And this obstruction here causes a problem with airflow coming back out again.
Such to the point that sometimes the time that a patient has for inhalation is so small and the time that they require for exhalation is so large because the air can come in very easily but in terms of getting the air back out again, it’s very difficult. And again that’s because of obstruction that occurs in these distal airways.
So if you have a patient on a ventilator, you’ve got to be careful because you’re giving a breath in a certain time period. And if the air is not out by the end of that time period the patient is going to get another breath on top of the air that’s already in there. We call that breath stacking. So here’s one inhalation and the amount of time necessary for an exhalation. If there were to be another inhalation occurring before that exhalation is completely finished, then you would be adding this breath on the old breath. So we don’t want that to happen because if that were to happen is breath stacking were to occur.
What would happen to the amount of pressure in the intrathoracic space? It would build up and the lungs would become bigger and bigger and bigger until finally they will become under such high pressure that we would have the extreme example of what we talked about before with positive pressure ventilation. And the peep the intrathoracic pressures would be so high that venous return would be perilously low and that would cause no venous return, no cardiac output in cardiac arrest, which is very dangerous. And this is the reason why when we ventilate patients with COPD, we want to make sure that that doesn’t happen.
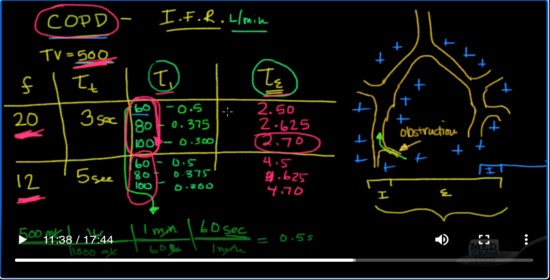
So let’s look at some examples here. Let’s look at some potential. Suppose we are going to ventilate a patient at a tidal volume of 500. Just to keep all things equal. Let’s look at the frequency that we could ventilate those patients at. Let’s look at therefore once we know the frequency, we’ll know the total time that they have for each respiratory cycle. We’ll be able to divide that into the inspiratory time. And then finally we’ll be able to look at the expiratory time and the key there is to maximize the expiratory time in patients with CPOD.
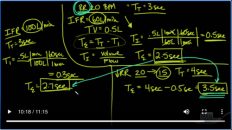
So let’s look at a couple of examples. Let’s say we’re going to set the patient up and give them a rate of 20. Okay, if that’s the case if there are 60 seconds in one minute and they’re going to breathe 20 times per minute, then you can see very easily how the total time for each respiratory cycle is three seconds. Okay, so that means they have three seconds to breathe in and to breathe out before the next breath is going to come. Now for the inspiration the inspiratory time the amount of time it’s going to take us to get that breath in is going to be dependent on the what we call the inspiratory flow rate. The inspiratory flow rate. So there are different examples of inspiratory flow rates and they’re usually measured in terms of liters per minute.
Okay, let’s pick a couple here. So one option is to go at 60 liters per minute. The other one is to go at 80 liters per minute. And then finally the last is to go at 100 liters per minute. Now in that situation, we have a little bit of calculating to do. Let’s for example look here and see what that would mean? How long would it take us to get 500 CC at 60 liters per minute.
Well, we can do a little bit of dimensional analysis for that and I’ll just give you an example here. We’ll do it once and then you’ll know where I get the rest of the calculations from. So if we have 500 milliliters and we know that there are 1000 milliliters in 1 liter. Okay, and that there is one minute in 60 seconds and there are 60 seconds in one minute. It’s actually should be 60 liters. Sorry. So we’re going to take our inspiratory flow rate right here, and we’re going to drop it in right here. Okay. So the 500 mL is how much volume we’re going to deliver. We’re just going to change it here to milliliters to liters. This is our inspiratory flow rate. And this is the fact that there are 60 seconds in one minute. We come to 0.5 seconds. Now, how do we come up with that? So the milliliters cross out with the milliliters, the liters cross out the liters, the minutes cross out the minutes. And what we’re left with is seconds.
So, in other words if we have 500 milliliters that we want to give the patient and we want to do it at a rate of 60 liters per minute. Then the total I time here is going to be 0.5. Now if we do that for the other ones at 80, what do you think’s going to happen to the I time if we’re increasing the inspiratory flow rate? That means we’re giving the air at a faster rate. Well, the time should decrease and in fact, it does. It goes to 0.375 and for a hundred it actually goes down to 0.30.
Okay. Now let’s look at another example here. Let’s say we take the frequency down to 12. Now if there are 12 breaths per minute then how many seconds will we have for each total time? Well 60 divided by 12 is 5, so we’ll have 5 seconds for each respiratory cycle. That means before the next breath comes it’ll be five seconds away. Again, let’s go ahead and divide the possibilities into 60, 80, and 100. Again, it’s going to be the same right because we haven’t changed the amount of tidal volume. We’re giving 0.5, 0.375 and 0.300.
So what we found here is we found the total time for the respiratory cycle. We found the inspiratory time. It takes depending on the inspiratory flow rate. And then here we have the expiratory time. Well, the expiratory time is simply going to be the total time, the amount of time it took to inhale. So let’s figure out what those would be. Here, the answer would be 2.50 seconds, that’s three seconds total minus the inspiratory time that it took so that would be 2.50. This one would be 2.625. This one would be 2.70. This one here would be 4.5. This one here would be 2, sorry, 4.625 and this would be 4.70. Now the key here again with COPD is that you want to give as much time as possible to allow the air to come out so you don’t get breath stacking.
Well, you can take that to an extreme. You can have the patient breathes one breath per minute and you’re absolutely guaranteed that you’re not going to have breath stacking. But what you’re not going to probably have is good ventilation. So you have to do it within reason. So the reason why I gave you two frequencies here is that these have 2 minute ventilations. Obviously, if you have to give 20 breaths per minute to meet the ventilation time, then you have to have it at 20. If you don’t, then you should ventilate it 12 or anywhere in between that. In other words pick the respiratory rate that’s going to allow you to ventilate.
Okay, but here’s the key is once you’ve picked the frequency and obviously the lower the frequency the more time you’re going to have for exhalation. But once you’ve picked it, I want you to notice this that the inspiratory flow rate can help you because manipulating the inspiratory flow rate is really not going to change your minute ventilation because remember your minute ventilation is your frequency times your title volume. Okay, but notice that by increasing your inspiratory flow rate in these patients, you can get almost an additional 0.2 seconds of exhalation time so that you don’t get breath stacking.
The most effective way of increasing the exhalation time and reducing your ability to have breast stacking is to decrease the rate. So I would decrease the rate as much as you possibly can could. First, however, you can’t decrease it that much because you’re going to have to ventilate the patient. So I would decrease it as much as you possibly can and then once you’ve got to that point, I would increase the inspiratory flow rate. Okay to decrease the I time, to allow the most amount of E time so that you can get exhalation. So this is a very nice way of remembering that in patients with COPD you tend to want to set the respiratory rate low and the inspiratory flow rate high. And I typically like to keep it between 80 and 100. Okay, and that’s for patients with COPD. Patients with COPD like to breathe slowly and deeply as opposed to patients with pulmonary fibrosis, which like to breathe quickly and shallowly.
Okay, the other aspect of COPD that I think you ought to know is peep. Now we talked about peep earlier. Remember peep is the amount of pressure that’s left in the bronchi at the end of exhalation. And we found that this was very useful in patients with ARDS or other types of issues like congestive heart failure where we want to stent open the alveoli to allow oxygenation. Okay, so that’s that’s a very important thing to be able to do. We find in patients with COPD, however, that peep not only will stent open the alveoli but may also be beneficial in stenting open these areas of obstruction.
Okay. Now this sounds kind of counterintuitive when we’re having a problem with patients trying to breathe out. Why would we want to increase the pressure during that time when they’re trying to breathe out? And the answer is here when you increase the positive end expiratory pressure. Okay. So when you’re applying it here at the end of exhalation, what you’re actually trying to do is stent open these airways. Stent open these air ways that are collapsing in exhalation because remember the patient is exhaling on a ventilator that means the pressure inside of these bronchi are going to become less positive. But by leaving a little bit of peep, you’re overcoming this pressure or what we call auto-peep. This pressure that is keeping these airways closed in this people actually stent them open. The way I like to think of peep in this sense is we like to think of peep as like CPAP for sleep apnea just like as CPAP keeps the back of your throat or open during obstructive sleep. Apnea peep is going to keep these bronchi open now. There’s maneuver that you can do on some ventilators where they check for auto peep.
So what’s auto-peep? Auto-peep is basically the amount of pressure that’s locked into the alveoli. Okay auto-peep. It’s the pressure that’s in the alveoli that has to be overcome in this column before airflow will start to move. The best way I can use to explain that is auto-peep is this pressure down here in the alveolus. And the reason why there’s pressure in the alveolus, it is because there’s an obstruction somewhere along the bronchial and that’s happens in COPD.
Well, when you have this pressure built up in this alveolus, remember air will only flow into this alveolus if the pressure in the alveolus is lower than the pressure in the bronchi and so what happens is you have to have a pressure here above that of the pressure here for flow to start going in. And so what you’ll see in these patients with auto-peep is that they’re trying to take a breath in there on the ventilator. They’re trying to take a breath in but because there’s such a high amount of auto-peep here. They can’t open that up and the amount of pressure they have to generate here is they have to generate all this auto-peep from let’s say let’s say their auto-peep is 12. That means they have to generate a negative 12 pressure down here in the alveolus when they’re breathing in to get this level down to a number less than 0, so that air can start to flow into it.
Well, the way we counteract this if you will is the typically what I’ll do is I will take 70% of the auto-peep number and you can actually do an auto-peep maneuver on the ventilator and it will tell you what the auto-peep is. It can measure the auto-peep by doing an auto-peep maneuver basically there’s a static way of measuring that. Okay, so let’s say it’s 12. What I will then do is I will take 70% of that value of 12, which is about eight and a half. Let’s just say eight and I’ll actually set my peep my dial into eight. Now, what does that do that? That does something here. That puts pressure over here above the obstruction at around an eight. And so if the auto-peep level is still 12, that means now the patient only has to breathe in and therefore make this positive pressure down only to eight and not to zero before airflow will start to come in.
Okay, so think of auto-peep as the positive pressure that stuck in your alveoli that you have to overcome by generating a negative pressure when you breathe in before airflow will start. Okay, and if that auto-peep is 12 and the end the the pressure here is zero. That means you’re going to have to generate 12 centimeters of negative pressure before air will start to flow in. Well, if I can set my peep to 8, which is about 70% of what I can detect on the auto-peep, then now I only have to generate a fraction of that and it’s a much more comfortable situation. I can trigger the ventilator more easily and I’ll be more comfortable.
Okay. So those are some strategies for ventilating patients with COPD on the ventilator.
Add comment